
How to Make Milk Kefir
Last Updated on November 12, 2025 by Kayla Ruetten
Milk kefir is one of the easiest fermented foods to make and a cornerstone to the GAPS diet. Culturing foods at home is an inexpensive way to consume probiotics which can help digestive and immune health. Unlike yogurt, it requires no heat, and unlike fermented veggies (when made incorrectly), milk kefir does not typically mold. It is easy, forgiving, and really tasty! Our children’s favorite way to drink milk kefir is in our 3 ingredient homemade fermented smoothies.

What is Milk Kefir?
Before we began eating the GAPS diet, we had never tried making milk kefir. I was slightly leery of the grains, which are basically clumps of bacteria.
Milk kefir is a fermented dairy beverage, created by combining milk kefir grains and milk. Fermentation produces carbon dioxide and lactic acid, resulting in a slightly bubbly, tangy, yogurt-like drink. During fermentation, the kefir grains break down the lactose into simple sugars: galactose and glucose. Even those with lactose or dairy sensitivities can often consume milk kefir.

The Differences Between Milk Kefir and Yogurt
Yogurt is produced by combining milk and bacteria strains. It requires raising the temperature in order to culture into yogurt. The bacteria found in yogurt provide food for the friendly bacteria found in a healthy gut. Yogurt is a “transient bacteria”, which passes through the digestive tract. Each particular strain of yogurt has its own set of bacteria that create its unique properties. Some yogurt strains have just one or two types of bacteria, some have many different bacteria. Store-bought yogurts tend to be more mono-cultural than homemade yogurt.
Kefir is a symbiotic culture of bacteria and yeasts, cultured at room temperature. The bacteria in milk kefir can actually colonize the intestinal tract. Kefir also contains a far larger range of bacteria, in addition to containing yeasts. This large variety of helpful bacteria and yeasts makes milk kefir one of the most diverse probiotics you can make at home (source).
Similarities Between Milk Kefir and Yogurt
Both yogurt and milk kefir are cultured dairy products. Plentiful in bacteria that are beneficial for our bodies, both can be cultured continuously. Simply take a small amount of yogurt from a previous batch, add it to new milk, and make a new batch. Likewise, you can continue using the same kefir grains to new milk to produce continuous batches.
I hesitated too long to try kefir! Activating the grains seemed confusing, I thought it would be too sour for the kids’ taste, and I had no prior experience. When we finally made the kefir and began to drink it, I was AMAZED how:
- Much easier to was to make than yogurt. It is less time-consuming, requires less steps, and requires no heat to culture.
- We had unexpected results- see our story below!

Our Strep Throat & Milk Kefir Story
When our family had WEEKS of repeated strep throat, even after taking antibiotics (which destroy the good bacteria in our digestive system), a fellow GAPS mama recommended milk kefir. I was desperate for relief for our family, and bought these grains that same day. We began drinking kefir alongside a few other remedies and finally healed after repeat infections. Disclaimer: consult with your doctor if you have strep throat. If left untreated, it can cause serious complications, especially in children. However, I am sharing our story, because antibiotics were not effective for us, and these options provided us relief and wellness.
Live Grains vs Dehydrated Grains vs Kefir “Powder”
You can make kefir using live grains, dehydrated grains you can re-activate at home, or using a kefir “powder”. Source your grains at a local health food store, online, or a local kefir enthusiast. Note: Kefir started powders can generally be used for several batches, but cannot be used indefinitely the way kefir grains can be. We used the kefir powder with success while waiting for our grains to arrive in the mail.
Milk Kefir Recipe
I follow this recipe using live kefir grains (bought the dehydrated grains mentioned above). Following their easy directions to re-activate the grains, I have made continuous, delicious batches ever since!
How to Make Milk Kefir Recipe
Equipment
- glass mason jar
- coffee filter
- rubber band
- non-metal strainer
Ingredients
- milk kefir grains
- 4 cups fresh milk
Instructions
- Add milk kefir grains to a clean glass mason jar.
- Cover the grains with 4 cups of fresh milk. It is best to use raw, grass-fed, organic milk if possible. If you do not have access to a healthy source of raw milk, use the best organic option available from your local store.
- Cover the jar with a coffee filter and rubber band.
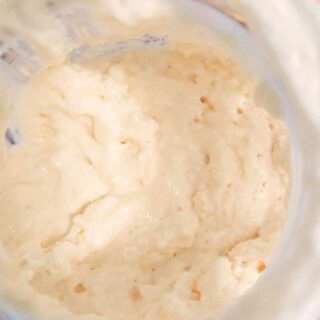
- Allow the milk to ferment for 12-24 hours. When it "turns", or looks like a thick cream, it is ready to use! Our favorite way to consume kefir is in our homemade fruit smoothie recipe (picky children love it this way!)
- Separate the milk kefir from the grains by pouring the kefir through a non-metal strainer (like this one). I find it easiest to just pour it directly into a new mason jar.
- Add the kefir grains into a new mason jar. Then, add new milk, and enjoy making continuous batches of yummy and highly nutritious kefir.
Resources
Posts
GAPS Diet Fermented Foods
What is the GAPS Diet – An Easier Explanation
How to Make Fermented Carrots (That Picky Eaters Love!)
3 Ingredient Fermented Milk Kefir & GAPS Yogurt Smoothies
Natural Remedies For Strep Throat
Shop This Post
- milk kefir grains
- apple cider vinegar
- grape fruit seed extract
- live grains
- dehydrated grains
- kefir “powder”
- glass mason jar
- plastic strainer
This post contains affiliate links, which means I make a small commission at no extra cost to you. See my full disclosure here.


I am on GAPS and very sensitive to histamine so I am going to try this but only start with 1-2 drops of it per day. How do I store it and for how long can a batch stay good for? I probably won’t use more than a tbsp per week at first.